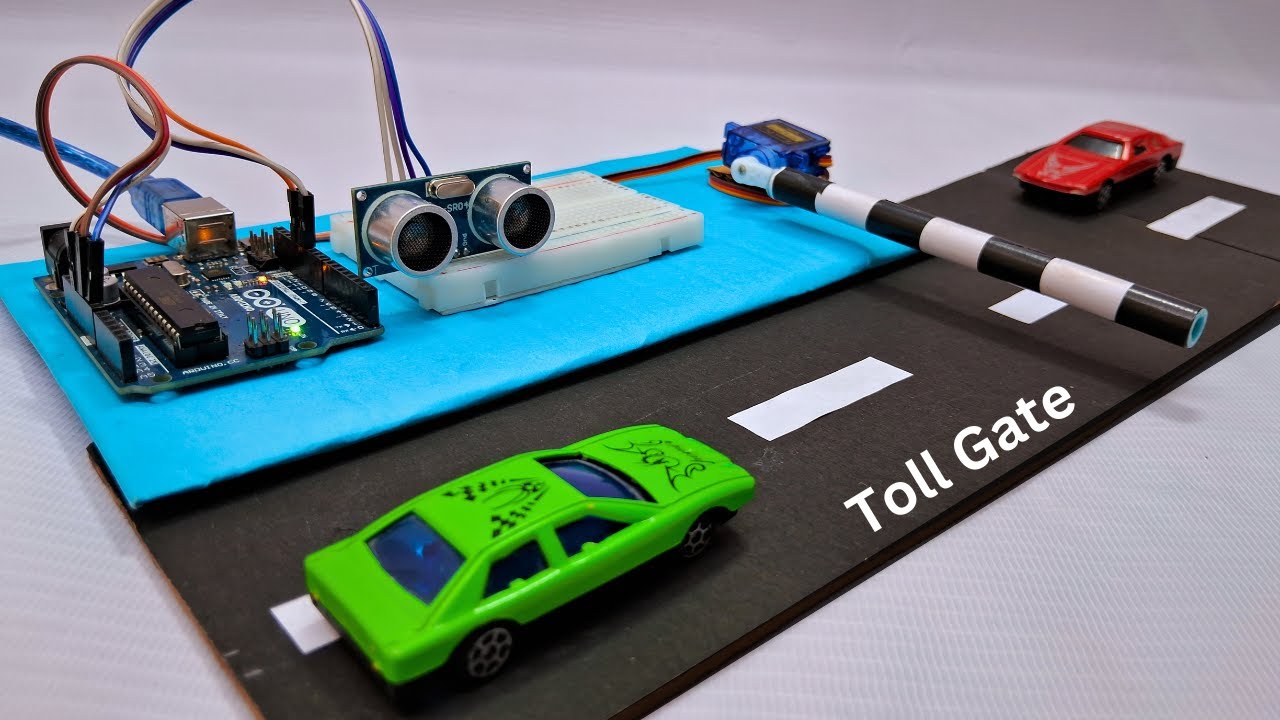
🚧 Arduino-Based Automatic Toll Gate System
This project simulates a smart toll gate system built around an Arduino Uno, designed to automatically detect vehicles and control a barrier gate mechanism. The system uses an HC-SR04 ultrasonic sensor to measure the distance of an approaching vehicle. When a vehicle enters the predefined detection range, the Arduino processes the signal and commands a servo motor to rotate, lifting the toll barrier arm. After a delay (or once the vehicle passes), the gate closes automatically.
⚙️ Working Principle
- The ultrasonic sensor continuously emits sound pulses.
- When a vehicle enters its detection range, the reflected echo signal is measured.
- Arduino calculates the distance using time-of-flight principle.
- If the distance is below a set threshold, Arduino activates the servo motor.
- The barrier gate rotates upward (typically 90°).
- After a programmed delay, the servo returns to its original position, closing the gate.
🧩 Components Used
- Arduino Uno
- HC-SR04 Ultrasonic Sensor
- Servo Motor (SG90 or similar)
- Breadboard & Jumper Wires
- Toy vehicle (for demonstration)
- Power Supply
🚦 Key Features
- Automatic vehicle detection
- Contactless barrier operation
- Adjustable detection range
- Programmable open/close timing
- Expandable to RFID or smart payment integration
🧠 Technical Concepts Involved
- Embedded C Programming
- Distance Measurement using Ultrasonic Sensors
- PWM-based Servo Control
- Real-Time Decision Logic
- Basic Automation & Access Control Systems
💡 Real-World Relevance
- This is not just a classroom model — it mirrors how automated toll plazas, parking lots, gated communities, and industrial entry systems operate. With further upgrades like RFID, number plate recognition, or IoT logging, it can evolve into a full smart infrastructure prototype.
Category
Hardware + Software
Difficulty
Intermediate
Complete Project KitContact for more
INSTANT DOWNLOAD / DELIVERY
- ✓ Complete Source Code
- ✓ Project Report (Word/PDF)
- ✓ PPT Presentation
- ✓ Installation Support
STEP 01
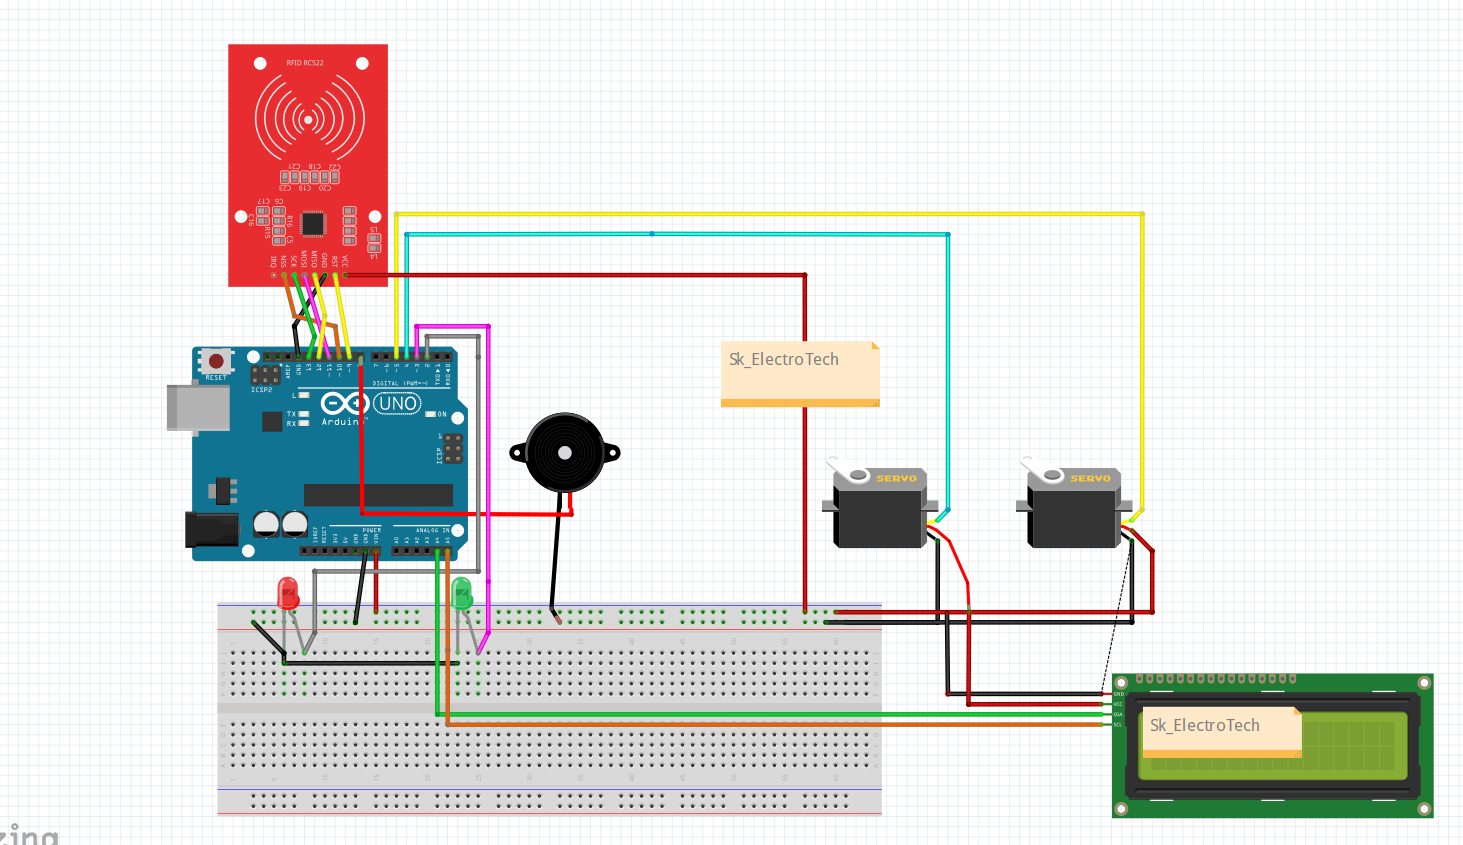
Components Required
Gather all the components usedd in this project which are listed below
1.Arduino Uno/Nano
2.Rfid reader and card
3.Servo(SG90/MG90)
4.Buzzer
5.Led(Red+green)
6. Breadboard
7.Jumper wires
8.LCD 16x2 i2c
STEP 02
Circuit Diagram
STEP 03
Arduino Ide Code
Arduino Code
/*
 * 🚀 Metro Door Opening System using RFID & Servos
 *
 * 🔧 This project demonstrates an automatic metro door opening system
 *    controlled by RFID cards and servo motors. When an authorized
 *    card is scanned, the metro doors open, and upon an unauthorized
 *    attempt, an alert system (LED & buzzer) is activated.
 *
 * 🎯 Features:
 *    ✅ RFID-based access control                                                                                     for more updates kindly visit sk_electrotech on instagram
 *    ✅ Dual servo motors for door movement
 *    ✅ LED indication for access status
 *    ✅ Buzzer alert for unauthorized access
 *
 * 📌 Follow @sk_electrotech on Instagram for more project ideas! 🔥
 * 💡 "Innovation distinguishes between a leader and a follower." – Steve Jobs
 * 💡 "The best way to predict the future is to create it." – Peter Drucker
 */

#include <Wire.h>
#include <LiquidCrystal_I2C.h>
#include <Servo.h>
#include <SPI.h>
#include <MFRC522.h>

#define SS_PIN 10
#define RST_PIN 9
#define SERVO_LEFT_PIN 4
#define SERVO_RIGHT_PIN 5
#define BUZZER_PIN 8
#define RED_LED_PIN 2
#define GREEN_LED_PIN 3

LiquidCrystal_I2C lcd(0x27, 16, 2); // I2C Address (0x27 or 0x3F depending on your LCD)
Servo leftServo;
Servo rightServo;
MFRC522 rfid(SS_PIN, RST_PIN);

byte authorizedUIDs[][4] = {
    {0x33, 0x20, 0x42, 0xFB},
    {0xA3, 0xDC, 0x54, 0xFB},
    {0x19, 0x35, 0x57, 0x6D}
};

int authorizedCount = 0; // Counter for authorized scans

void setup() {
    Serial.begin(9600);
    SPI.begin();
    rfid.PCD_Init();

    lcd.init();
    lcd.backlight();
    displayMessage("Metro Door Ready", "Scan Card...");

    leftServo.attach(SERVO_LEFT_PIN);
    rightServo.attach(SERVO_RIGHT_PIN);

    pinMode(BUZZER_PIN, OUTPUT);
    pinMode(RED_LED_PIN, OUTPUT);
    pinMode(GREEN_LED_PIN, OUTPUT);

    leftServo.write(0);
    rightServo.write(180);
    digitalWrite(RED_LED_PIN, LOW);
    digitalWrite(GREEN_LED_PIN, LOW);
    digitalWrite(BUZZER_PIN, LOW);
}

// Function to display messages on LCD
void displayMessage(String line1, String line2) {
    lcd.clear();
    lcd.setCursor(0, 0);
    lcd.print(line1);
    lcd.setCursor(0, 1);
    lcd.print(line2);
    Serial.println(line1 + " | " + line2);  // Print the same message on Serial Monitor
}

// Function to check if a scanned card is authorized
bool isAuthorized(byte *cardUID) {
    for (int i = 0; i < 3; i++) {
        bool match = true;
        for (byte j = 0; j < 4; j++) {
            if (cardUID[j] != authorizedUIDs[i][j]) {
                match = false;
                break;
            }
        }
        if (match) return true;
    }
    return false;
}

void loop() {
    if (!rfid.PICC_IsNewCardPresent() || !rfid.PICC_ReadCardSerial()) {
        return;
    }

    Serial.print("🔹 Card UID: ");
    String uidStr = "";
    for (byte i = 0; i < rfid.uid.size; i++) {
        Serial.print(rfid.uid.uidByte[i], HEX);
        Serial.print(" ");
        uidStr += String(rfid.uid.uidByte[i], HEX) + " ";
    }
    Serial.println();

    displayMessage("Card Scanned:", uidStr);  // Show UID on LCD

    bool authorized = isAuthorized(rfid.uid.uidByte);

    if (authorized) {
        authorizedCount++; // Increment authorized scan count
        Serial.println("✅ Access Granted - Opening Doors");
        displayMessage("Access Granted", "Opening Doors...");
        digitalWrite(GREEN_LED_PIN, HIGH);
        digitalWrite(RED_LED_PIN, LOW);
        digitalWrite(BUZZER_PIN, HIGH);
        delay(200);
        digitalWrite(BUZZER_PIN, LOW);

        leftServo.write(90);
        rightServo.write(90);
        delay(3000);

        Serial.println("🚪 Closing Doors...");
        displayMessage("Doors Closing...", "Wait...");
        leftServo.write(0);
        rightServo.write(180);
        digitalWrite(GREEN_LED_PIN, LOW);
    } else {
        Serial.println("❌ Access Denied");
        displayMessage("Access Denied", "Try Again!");
        digitalWrite(RED_LED_PIN, HIGH);
        digitalWrite(GREEN_LED_PIN, LOW);

        for (int i = 0; i < 5; i++) {
            digitalWrite(BUZZER_PIN, HIGH);
            digitalWrite(RED_LED_PIN, HIGH);
            delay(100);
            digitalWrite(BUZZER_PIN, LOW);
            digitalWrite(RED_LED_PIN, LOW);
            delay(100);
        }
        digitalWrite(RED_LED_PIN, LOW);
    }

    delay(1000);
    String countMsg = "Total Card.: " + String(authorizedCount);
    displayMessage("Scan Next Card", countMsg);
    rfid.PICC_HaltA();
}